If you're a renter exploring electric cooking or planning backpacking meals on a budget, a food dehydrator might just become your new favorite tool. Here's how I used one to prepare for a honeymoon hiking trip—and discovered the joy of home-cooked meals at 10,000 feet.
Electric cooking meets backpacking
It’s often said that food is the way to a person’s heart. What about home-cooked food that has been dehydrated and then later rehydrated and eaten at the top of a mountain? Does that also work? Last year, to prepare for my honeymoon backpacking trip in Sequoia National Park, I went on a journey to find out.
Why I chose to make my own backpacking meals
I first came across the idea that you can dehydrate your own food with a countertop appliance when I was working in Yosemite National Park about a decade ago. At the time, I thought it was cool for my colleague who was planning to spend a month in the backcountry as a wilderness ranger, but not necessarily for me.
Backpacking food that you buy off the shelf isn’t too bad, and for my two—to four-night trips, those products suited me just fine. That all changed last year when I started planning a honeymoon backpacking trip for my husband and I.
I love to cook, especially to show my love for others, so I—of course—wanted to do something special for this trip. I recently came across the Itacate brand, a Latina-owned backpacking food company, and was blown away by how good the food tasted. It made me realize that backpacking meals did not have to compromise taste for portability. It also tasted more like what I like to cook, so I wondered if I could replicate that quality of flavor with my own DIY backpacking recipes.
Why I chose to make my own backpacking meals
Plus for our honeymoon, we were doing a longer trip and needed to be super space-efficient with what we brought in our bear canisters–the containers required for backpacking in the Sierras to protect bears from getting into your food. Not only that, I was primed to consider a new electric appliance for my kitchen because I have been on a journey for the last few years, learning about the benefits of electric cooking.
I first learned about the climate and health benefits of using electric appliances about five years ago while studying for a master's in environmental policy. In parallel with my journey to learn the different policy changes and collective action that we can take as a society to move off of fossil fuels, I’ve also been on my own personal journey toward eliminating fossil fuels in my life.
As a renter with a gas stove, I have been steadily purchasing affordable electric countertop appliances to replace many of the cooking tasks.
As a renter with a gas stove, I have been steadily purchasing affordable electric countertop appliances to replace many of the cooking tasks. It started with an electric kettle. That one was a no-brainer. It’s easier and faster to boil water using a kettle than in a pot over a stove for my morning pour-over coffee. The next move was to purchase a single-burner induction hob. After doing some internet research and asking my expert colleagues, I landed on this Duxtop model. I’ve been using it for over three years and have come to totally rely on it. I don’t have AC, so the electric induction cooktop is a game changer in the summer when my apartment gets hot, and I want to avoid all of the added heat that the gas stove gives off. I also love the super-fast boiling times, the precision controls, and the easy cleanup.
Appliances I use or recommend (all Amazon-available):
- Electric kettle – Fast, efficient, perfect for pour-over coffee.
- Induction hob (single burner) – Boils water quickly, keeps kitchen cool, and cleans up in seconds.
- Dehydrator (and a food-safe silicone bowl for rehydrating) – Great for backpacking prep or zero-waste kitchen projects.
- Toaster oven – Energy-efficient oven functionality without heating the whole kitchen.
Getting started with a food dehydrator
Because I was already on an electrification journey, it made sense to add a food dehydrator to my electric repertoire. I chose the NESCO FD-1040 Gardenmaster Digital Pro Dehydrator and then spent some time on YouTube watching videos to get some recipe inspiration. For my first attempt, I ended up going with lentils and white rice (see my recipe below!).
Here’s what I learned:
- Skip the oil: It can go rancid and reduce the shelf life of what you dehydrate. Instead of sauteing the veggies in oil, substitute the oil with water.
- Induction cooking works wonders: Both lentils and rice are great dishes to make on induction hobs because of induction’s precise and even temperature capability.
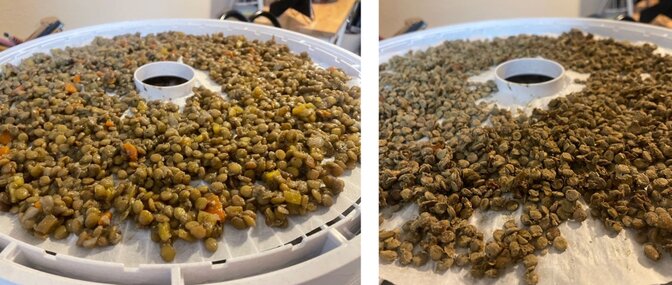
- Use even cuts: It's important for all of the ingredients to be more or less a uniform size so that everything dries at about the same rate. On my first go around, my carrot pieces were bigger than everything else, so they took longer to fully dry out.
Despite a few rookie mistakes, my meals turned out great—and I was hooked.

Field Test: Cooking electric meals on the trail
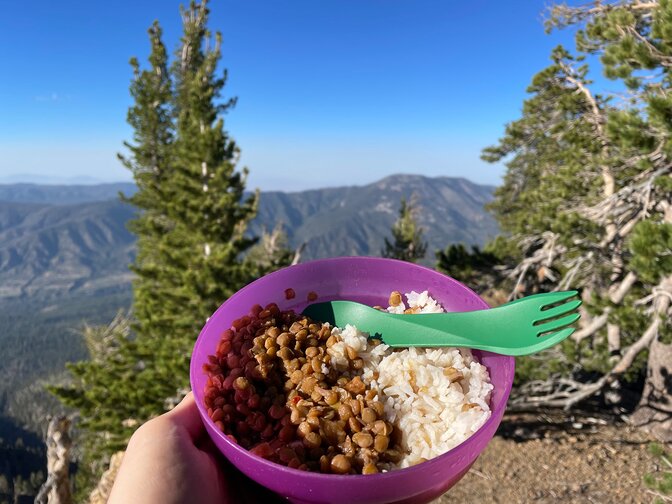
In order to test out the rehydration process, we took a weekend backpacking trip with some friends to the San Gorgonio Wilderness in the mountains above the Inland Empire. After a steep hike to our campsite, we were ready for a warm, home-cooked dinner. I rehydrated the lentils and rice in a Stasher four-cup silicone bowl by adding boiling water to cover the food, plus an inch above. The end result did not disappoint! When that first bite hit, we were immediately transported to the flavors of home. The process was totally worth it.

Honeymoon highlights: Dehydrated meals in the Sierras
With the confidence from our test trip, I was even more excited to try out some new DIY backpacking meals for the real deal—our honeymoon. Along with our now go-to lentils and rice, I added:
- Macaroni and cheese with dehydrated tofu and veggies
- Rice noodles with tofu, veggies, and a coconut-peanut butter sauce
Thanks to the space-saving efficiency of dehydrated meals, we fit everything into a smaller bear canister—a bonus, along with the satisfaction of cooking with electricity instead of gas. But the biggest win? The joy of sharing a warm, homemade backpacking meal after a long hike. It felt like love in a bowl.
I had already found my husband’s heart, but something as simple as dehydrated food turned out to be the garnish for our honeymoon adventure!

Recipe: Dehydrated lentils and rice (vegan + trail-tested)
Makes four servings
For the rice:
Cook 1 cup according to package instructions.
For the lentils:
Ingredients
- 1 cup whole green lentils
- 1 medium yellow onion diced small and uniformly
- ¼ cup tomato paste
- 1 tablespoon cumin
- 2 teaspoons salt - more to taste
- 2 teaspoons black pepper
- 1 teaspoon smoked paprika
- 1 tablespoon oregano
- 2 teaspoons garlic powder
- 2 tablespoons water
Prep instructions
- Saute onions in water (not oil!) on medium heat until slightly brown for 5-10 minutes.
- Add all the spices.
- Add tomato paste and cook for 3-5 minutes.
- Add 3 cups of water (or whatever the package says), and bring to a boil. Note: I added a little less than what the package instructions called for because you want to make sure the lentils don’t have any excess water when they’re done cooking.
- Cover, reduce to a simmer, and cook until lentils are done.
Dehydration instructions
- Spread the cooked rice and cooked lentils out on the trays.
- Set the machine to the vegetable setting and dehydrate for 8 hours or until completely dry.
Rehydration instructions
- Place the dried lentils and rice in a food-safe container.
- Add enough boiling water to cover the food, plus an inch above. Stir and seal the container.
- After 5 minutes, stir, then seal again and wait another 5 minutes.
- Test the food for doneness and enjoy!
Note: Rehydration times increase a few minutes with every 5,000 ft of elevation.
The Switch Is On team loves and lives electric
If you enjoyed this story and the practical tips to switch to electric, sign up for The Switch Is On e-newsletter.